
Microsoft Power platform Dataverse has an API within Dataverse that allows you to consume Dataverse API. You can retrieve data from CRM Dynamics 365 or Power Platform developed application using this API.
You can access Dataverse API directly from the consumer applicaiton using an application user. If you are interested in this approach, the following link has a step-by-step guideline about how to implement it using passwordless authentication thanks to managed identity in Azure.
However, Dataverse has some limitation. You can do around 6000 requests every 5 minutes and 1 Million requests per day on the tenant level. So API integration with Dataverse requires some strategical extra thinking for long term integration and specially in enterprise context to avoid a bottleneck once you have more and more integration are added to your environment.
You need to think about caching to reduce API call to Dataverse whenever possible, you should think about providing a single endpoint of entry to an entity (table) in Dataverse.
Also you might don’t want to share all entity fields or row to the consumer application.
Azure API Management tool allows you to expose Dataverse API data to your applicaitons or users without granting direct access to your client application to Dataverse and without creating an extra API to transform the result. This can be done using API Product Policy and API Endpoint policy.
What is API Product Policy or Api endpoint policy?
In Azure API Management, API publishers can change API behavior through configuration using policies. Policies are a collection of statements that are run sequentially on the request or response of an API. API Management provides more than 50 policies out of the box that you can configure to address common API scenarios such as authentication, rate limiting, caching, and transformation of requests or responses. For a complete list, see API Management policy reference.
Policies can be applied on several levels, Product, API or/and API Endpoint.
In the following tutorial we will be going through a step-by-step guideline about how to consume Dataverse API using passwordless authentication and transform the result and add caching capacity.
Step 1: Set up Dataverse API
Make sure you have the necessary permissions and credentials to access Dataverse API.
Step 2: Create an API in API Management
- Login to Azure Portal: Log in to the Azure Portal (https://portal.azure.com/).
- Navigate to API Management: Open your API Management service instance.
- Create a new API:
- Go to the “APIs” section.
- Click on “Add a new API.”
- Choose “Blank API” to create a custom API.
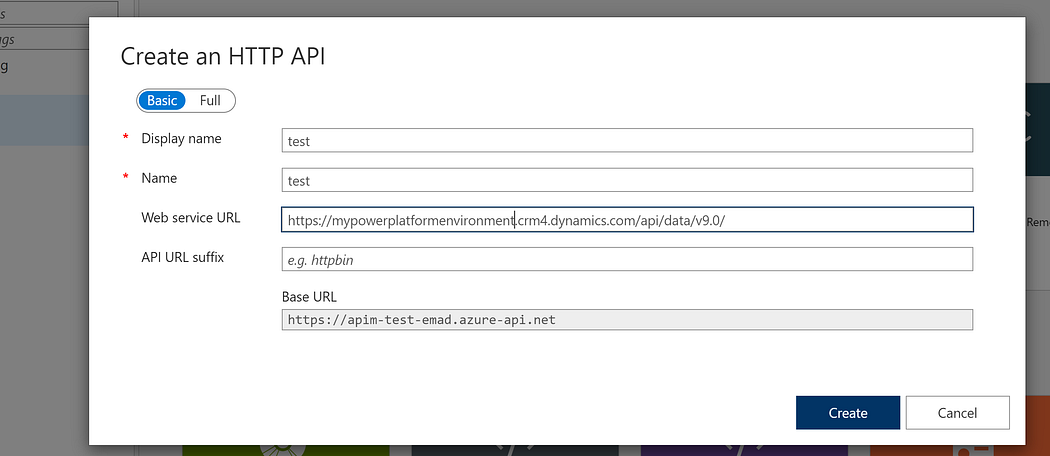
- Configure API Details:
- Fill in the necessary details like Display Name, Name, and Version.
- Set the Web service URL to your Dataverse API endpoint:
https://{{youpowerplatformenvironmentname}}.crm4.dynamics.com/api/data/v9.0/
Step 3: Define Operations
- Create Operations:
- In your API, go to the “Operations” tab.
- Create WhoAmI operation to test the connectivity first:
WhoAmI
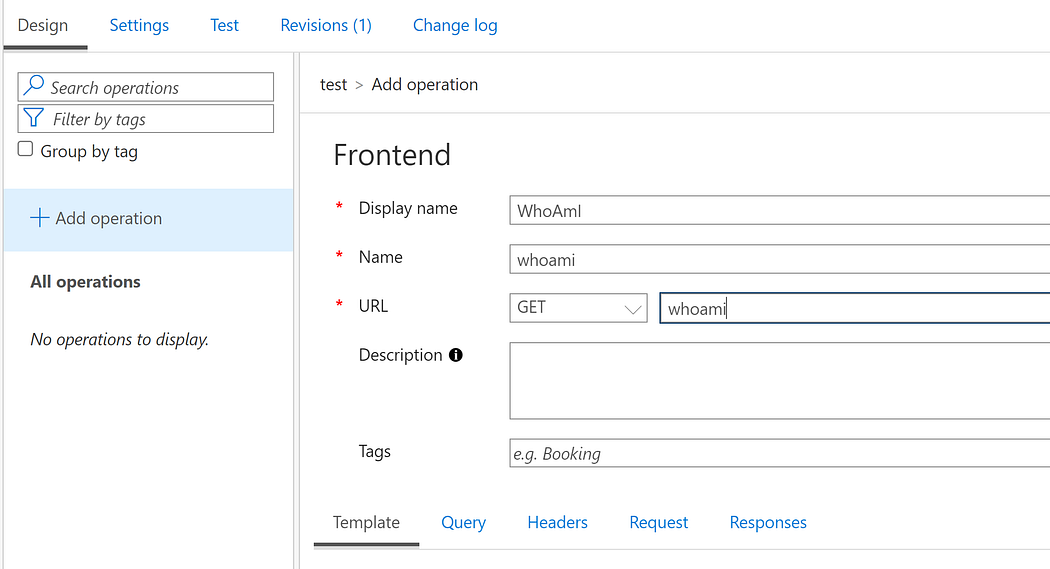
Using this endpoint during test after configuring all the steps that are coming afterward will allow you to test your identity in Dataverse
Step 4: Create a managed identity
We need to authenticate to Power Platform Dataverse API. In order to do so , we will use a User Assigned Managed Identity. The reason why we use this is to privilige passwordless authentication.
We will do the following steps:
1- Create the managed identity
2- Assign it to the API Management Tool as an Identity
3- Add it as application user to the Power Platform Environment.
Please follow the following article to achieve the three steps mentionned above but instead of granting the Managed Identity to The Logic App (from tne article), assign it to the API Management Tool.
Copy the client id of the created User Assigned Managed Identity (will be needed in the next step).
Make sure to assign a sufficient role to the Application user in the Power Paltform Environment to retrieve the data.
Step 4: Create a product policy
We will create a product policy to be used for all API calls in order to inject authentication JWT Token.
- On the left pane find click on product

2. Click on Add
3. Put Product Name “Test”, id and description
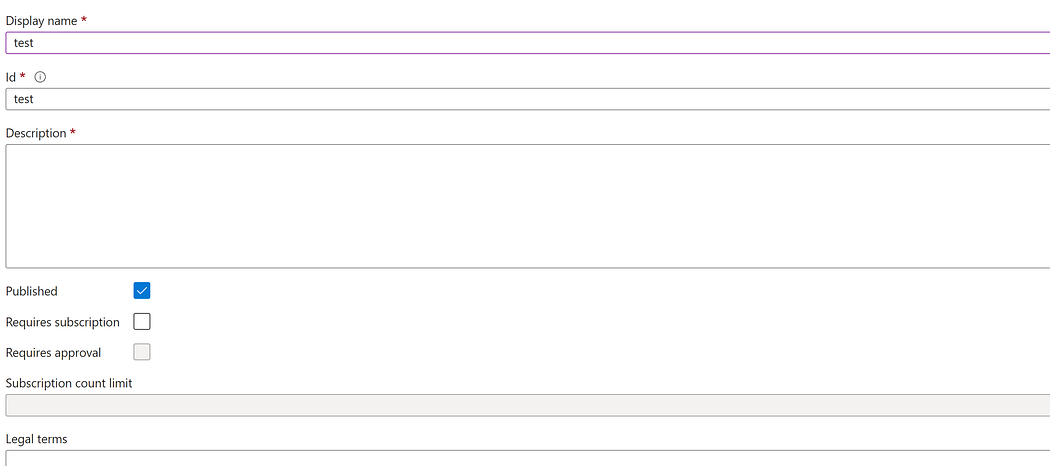
4. Check the public and we will not required subscription for this test.
5. Click on the “Create” button
6. Click on the created policy in the list
7. Go to Policies and the click on the policy </> sign:
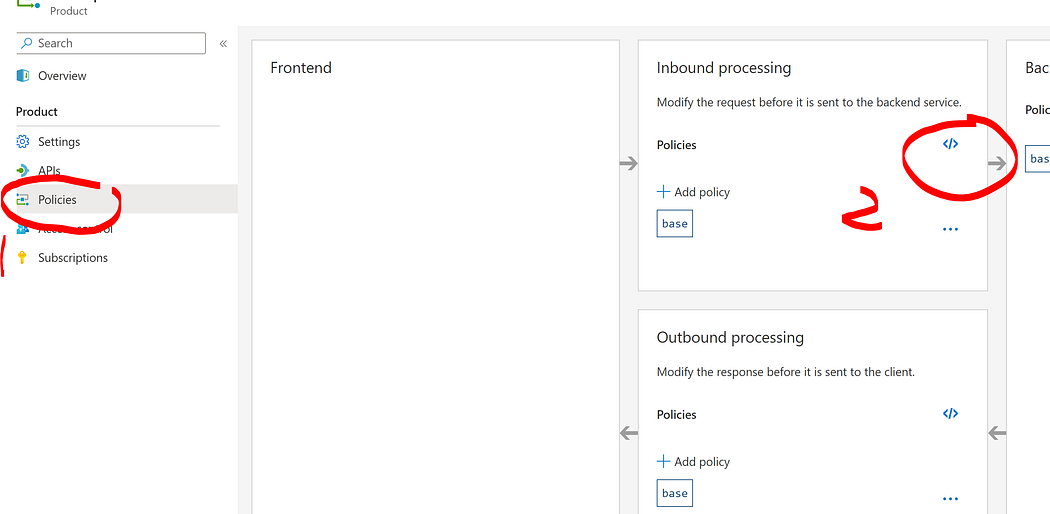
6. Replace the policy by the following code:
<!--
    IMPORTANT:
    - Policy elements can appear only within the <inbound>, <outbound>, <backend> section elements.
    - To apply a policy to the incoming request (before it is forwarded to the backend service), place a corresponding policy element within the <inbound> section element.
    - To apply a policy to the outgoing response (before it is sent back to the caller), place a corresponding policy element within the <outbound> section element.
    - To add a policy, place the cursor at the desired insertion point and select a policy from the sidebar.
    - To remove a policy, delete the corresponding policy statement from the policy document.
    - Position the <base> element within a section element to inherit all policies from the corresponding section element in the enclosing scope.
    - Remove the <base> element to prevent inheriting policies from the corresponding section element in the enclosing scope.
    - Policies are applied in the order of their appearance, from the top down.
    - Comments within policy elements are not supported and may disappear. Place your comments between policy elements or at a higher level scope.
-->
<policies>
<inbound>
<base />
<authentication-managed-identity resource="https://{{your-environment-name}}.crm4.dynamics.com" client-id="{{The client id of the user assigned identity to the APIM}}" output-token-variable-name="msi-access-token" ignore-error="false" />
<set-header name="Authorization" exists-action="override">
<value>@("Bearer " + (string)context.Variables["msi-access-token"])</value>
</set-header>
<!--- The parameters below are required by Data verse
-->
<set-header name="Accept" exists-action="override">
<value>application/json</value>
</set-header>
<set-header name="Content-Type" exists-action="override">
<value>application/json</value>
</set-header>
<set-header name="OData-MaxVersion" exists-action="override">
<value>4.0</value>
</set-header>
<set-header name="OData-Version" exists-action="override">
<value>4.0</value>
</set-header>
<set-header name="If-None-Match" exists-action="override">
<value>null</value>
</set-header>
<set-backend-service base-url="https://{{your-environment-name}}.crm4.dynamics.com/api/data/v9.2" />
</inbound>
<backend>
<base />
</backend>
<outbound>
<base />
</outbound>
<on-error>
<base />
</on-error>
</policies>
The inbound are the operations that will be executed on the request to the APIM. You can manipulate here the query parameters, add jwt token or retrieve information from cache.
- Resource: This should be the power platform or CRM Dynamics environment host name
- ClientId: The Id of the User Assigned Managed Identity.
Policies applied on the product will be applied on all APIs using this product.
#Step 5: Create Endpoint + Its policy
Now we will create an endpoint policy to where we will call an entity from Dataverse table (custom table) and transform the result.
1- On the left menu, click on the API
2- Click on the API yo u created in the previous step
3- Create a new endpoint called “items”
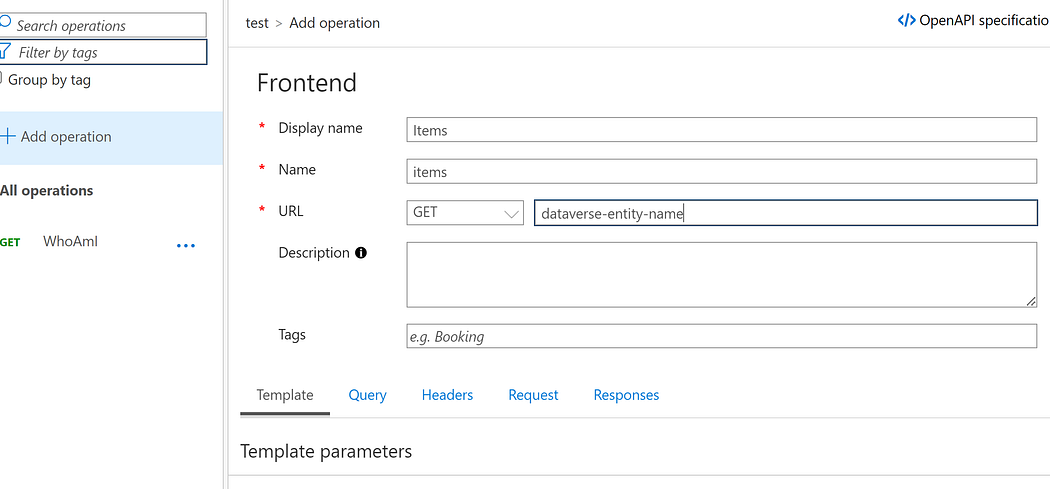
4- You API should look like the following photo. Click on policy:

The API endpoint policy will be applied in combination with the product policy.
5- Replace the policy with the following code:
<!--
    IMPORTANT:
    - Policy elements can appear only within the <inbound>, <outbound>, <backend> section elements.
    - To apply a policy to the incoming request (before it is forwarded to the backend service), place a corresponding policy element within the <inbound> section element.
    - To apply a policy to the outgoing response (before it is sent back to the caller), place a corresponding policy element within the <outbound> section element.
    - To add a policy, place the cursor at the desired insertion point and select a policy from the sidebar.
    - To remove a policy, delete the corresponding policy statement from the policy document.
    - Position the <base> element within a section element to inherit all policies from the corresponding section element in the enclosing scope.
    - Remove the <base> element to prevent inheriting policies from the corresponding section element in the enclosing scope.
    - Policies are applied in the order of their appearance, from the top down.
    - Comments within policy elements are not supported and may disappear. Place your comments between policy elements or at a higher level scope.
-->
<policies>
<inbound>
<base />
<!--
  Cache lookup will first look in the cache based on the query Parameters.
If the response if found in the cache, then we don't call the backend-->
<cache-lookup vary-by-developer="false" vary-by-developer-groups="false"
allow-private-response-caching="true"
must-revalidate="false"
downstream-caching-type="public"
caching-type="internal">
<vary-by-query-parameter>queryStringParam1</vary-by-query-parameter>
<vary-by-query-parameter>queryStringParam2</vary-by-query-parameter>
<vary-by-query-parameter>queryStringParam3</vary-by-query-parameter>
</cache-lookup>
</inbound>
<backend>
<base />
</backend>
<outbound>
<choose>
<when condition="@(context.Response.StatusCode == 200)">
<set-body>@{
                        var response = context.Response.Body.As<JObject>().Property("value").Values();
                        var newResponse=new JArray();
                        foreach (var oldLine in response) {
                          var line=new JObject();
                          line["column_name"]=oldLine.Value<string>("column_name");
                          newResponse.Add(line);
                        }
                        return newResponse.ToString();
                    }</set-body>
</when>
</choose>
<base />
<cache-store duration="15" />
</outbound>
<on-error>
<base />
This code will transform the response that we receive from Dataverse and return only a single column. You can do more :).
After that, the policy will set the response in cache for 15 minute. Please note that for this example, we use the cache of the Azure API Management by default. You can use an external centralized caching mechanism and use it via the policy.By following these steps, you can efficiently consume Dataverse API using an API management tool and reduce the need for extra development efforts. It provides a layer of abstraction, simplifies authentication, and allows for centralized management and monitoring.
API Management Tools can play way more important role than just a service catalog. But in the same time, you need to have a strategical decision about the usage of its advanced feature and to decide how tight you want to be to the component. One good approach for policy usage for this kind of scenarios where you have a solution that have an API and your requirements are limited to respnose transformation and caching mechanism to be centralized. This will decrease the need of creating an extra APIs and its related components just to consume a SAAS API or a Platform like Power Platform.